Yoho Valley Backpacking Route
View Photos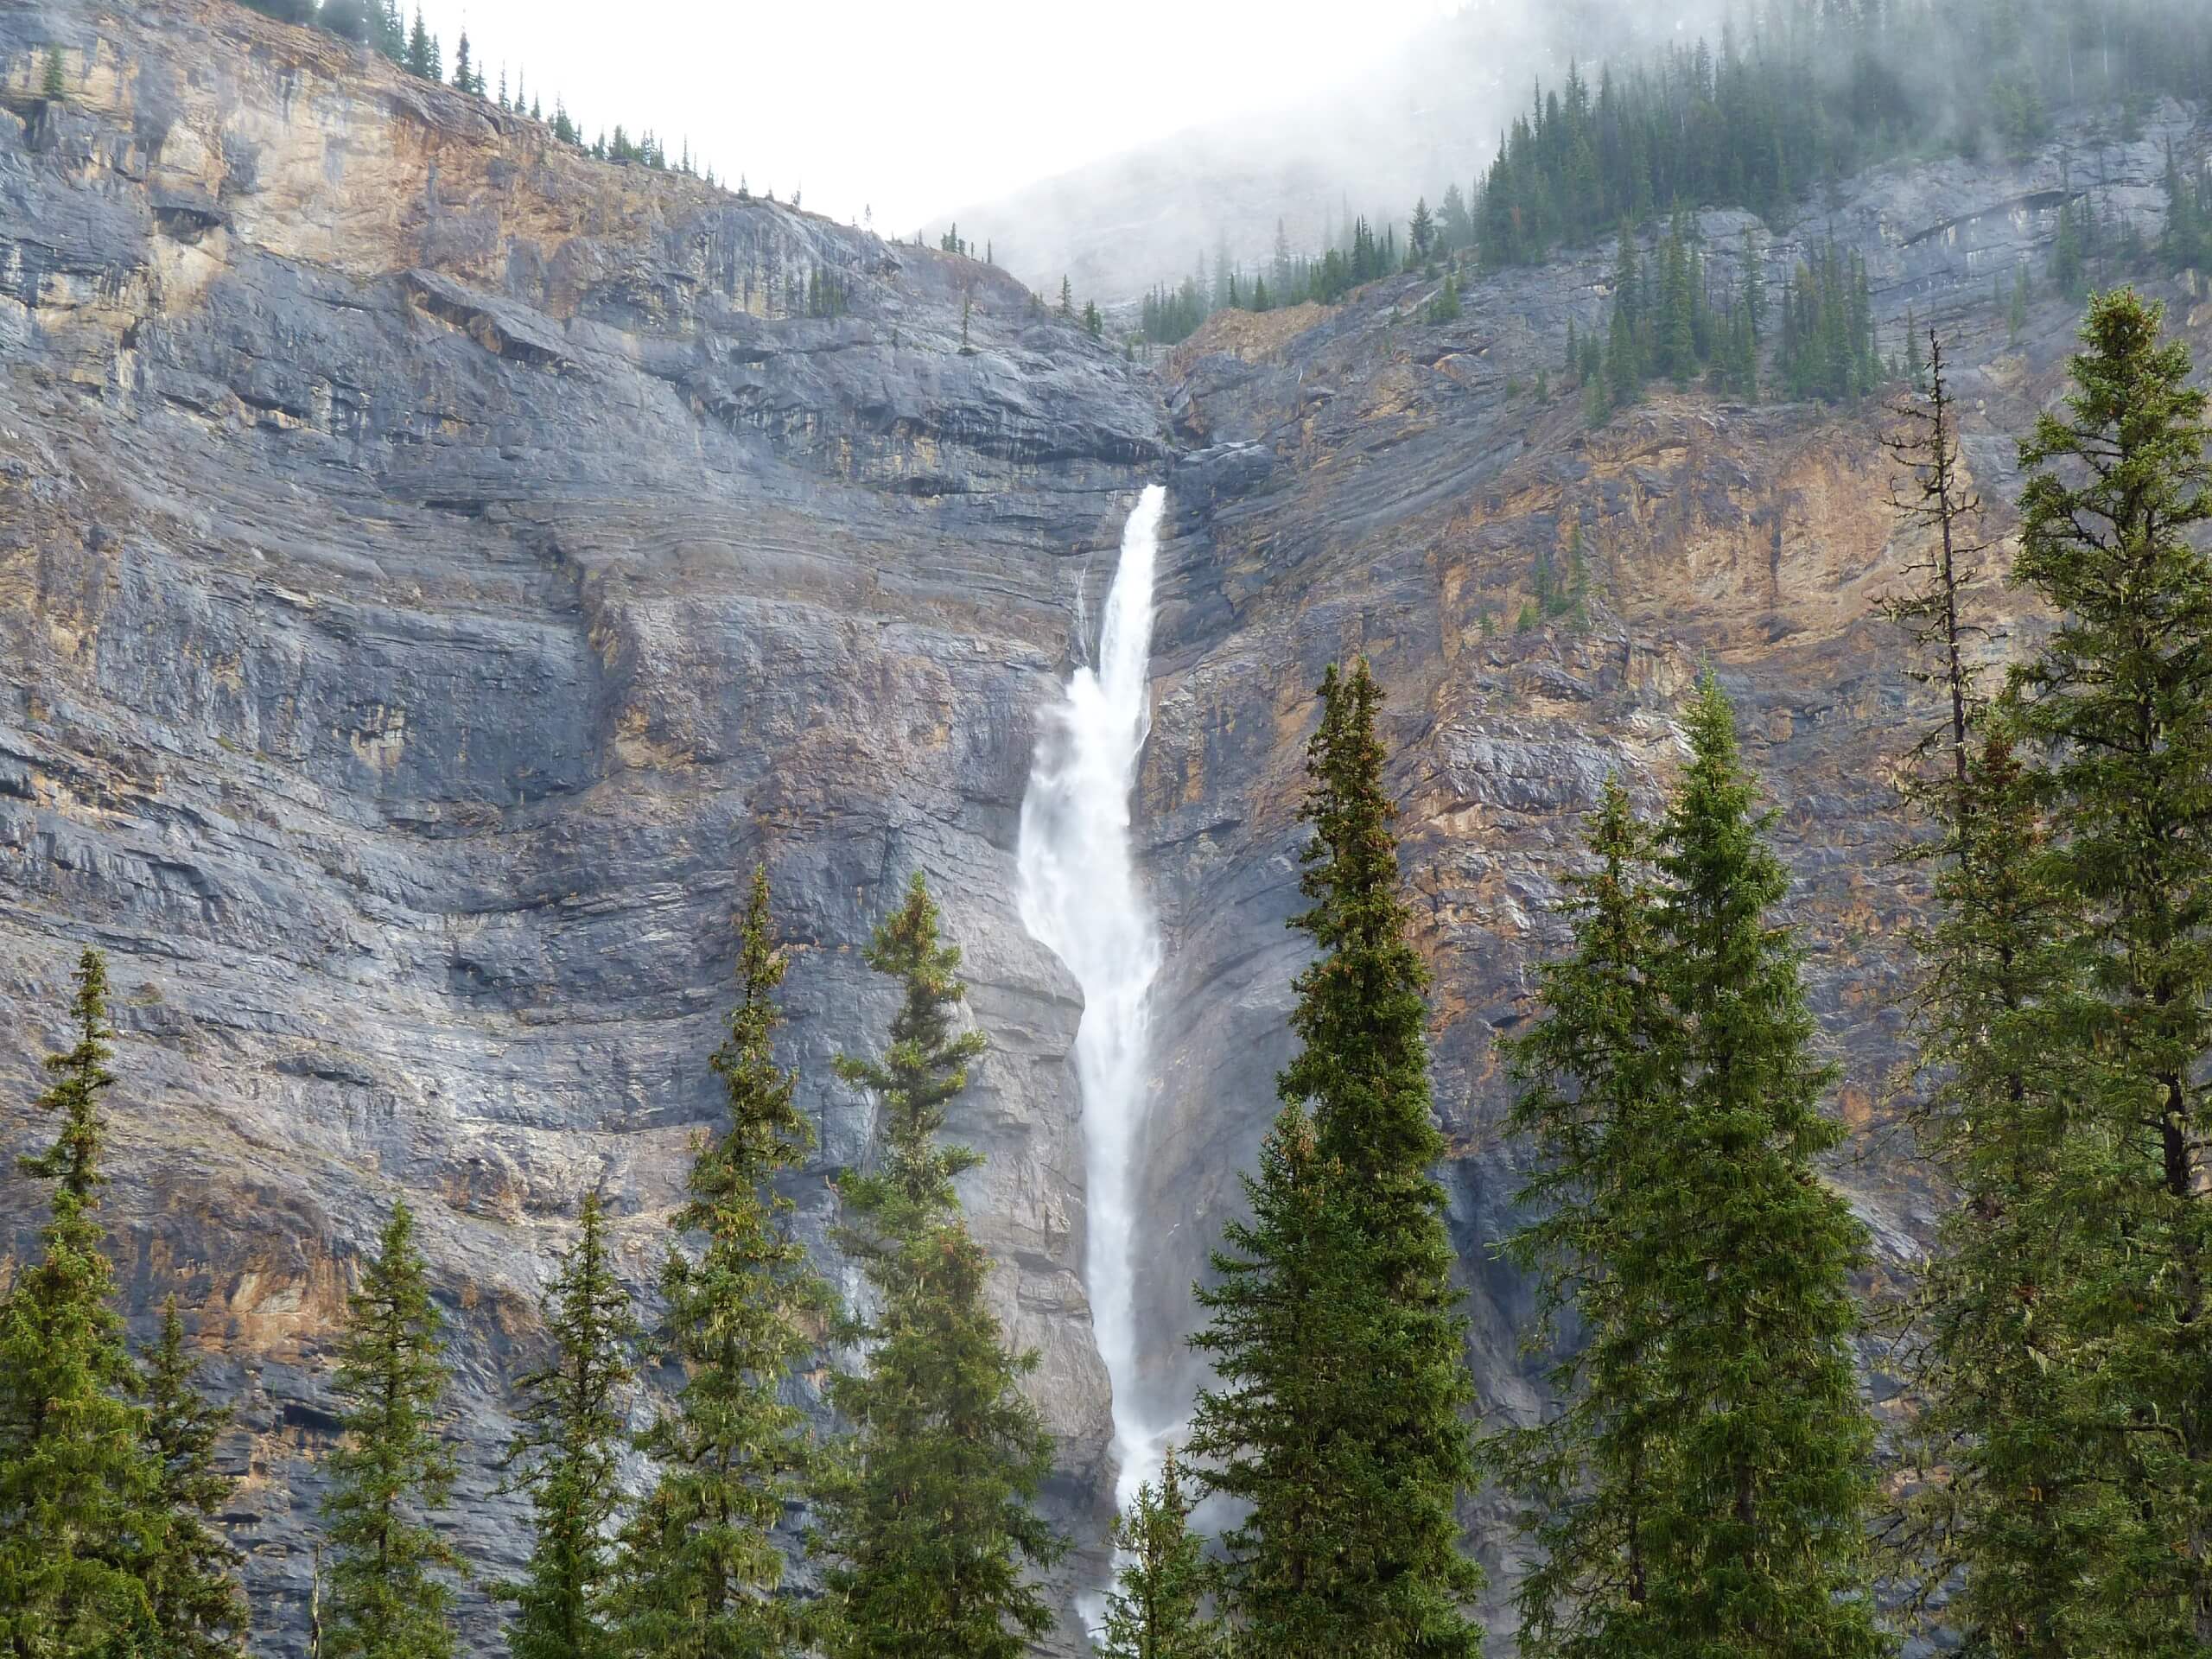
Yoho Valley Backpacking Route
Difficulty Rating:
With waterfalls, mountain lakes, and stunning views in all directions, this Yoho Valley backpacking tour is both challenging and rewarding. The terrain is rugged, but the distances each day are short enough to allow you to truly enjoy your spectacular surroundings without feeling rushed.
Getting there
Take the Trans-Canada Highway (Highway 1) west from Banff and Lake Louise and take the exit for Takakkaw Falls. (If you reach Field, BC, then you have passed the exit.) Drive north for about 8.7mi until you come to the parking area for this trail. Note that trailers are not permitted on this road.
About
| When to do | July, August, September |
| Backcountry Campsites | Twin Falls Campground / Little Yoho Campground |
| Family friendly | No |
| Route Signage | Average |
| Crowd Levels | Low |
| Route Type | Circuit |
Yoho Valley Backpacking Route
Elevation Graph
Weather
Route Description for Yoho Valley Backpacking Route
This 3-day backpacking route starts and ends at the stunningly beautiful Takakkaw Falls, which are over 984ft tall, and promises many more spectacular views along the way. The climbs can be challenging, but each day is short enough, granting the chance to take it easy and enjoy the journey.
Day 1: Takakkaw Falls to Twin Falls Campground (5.1mi)
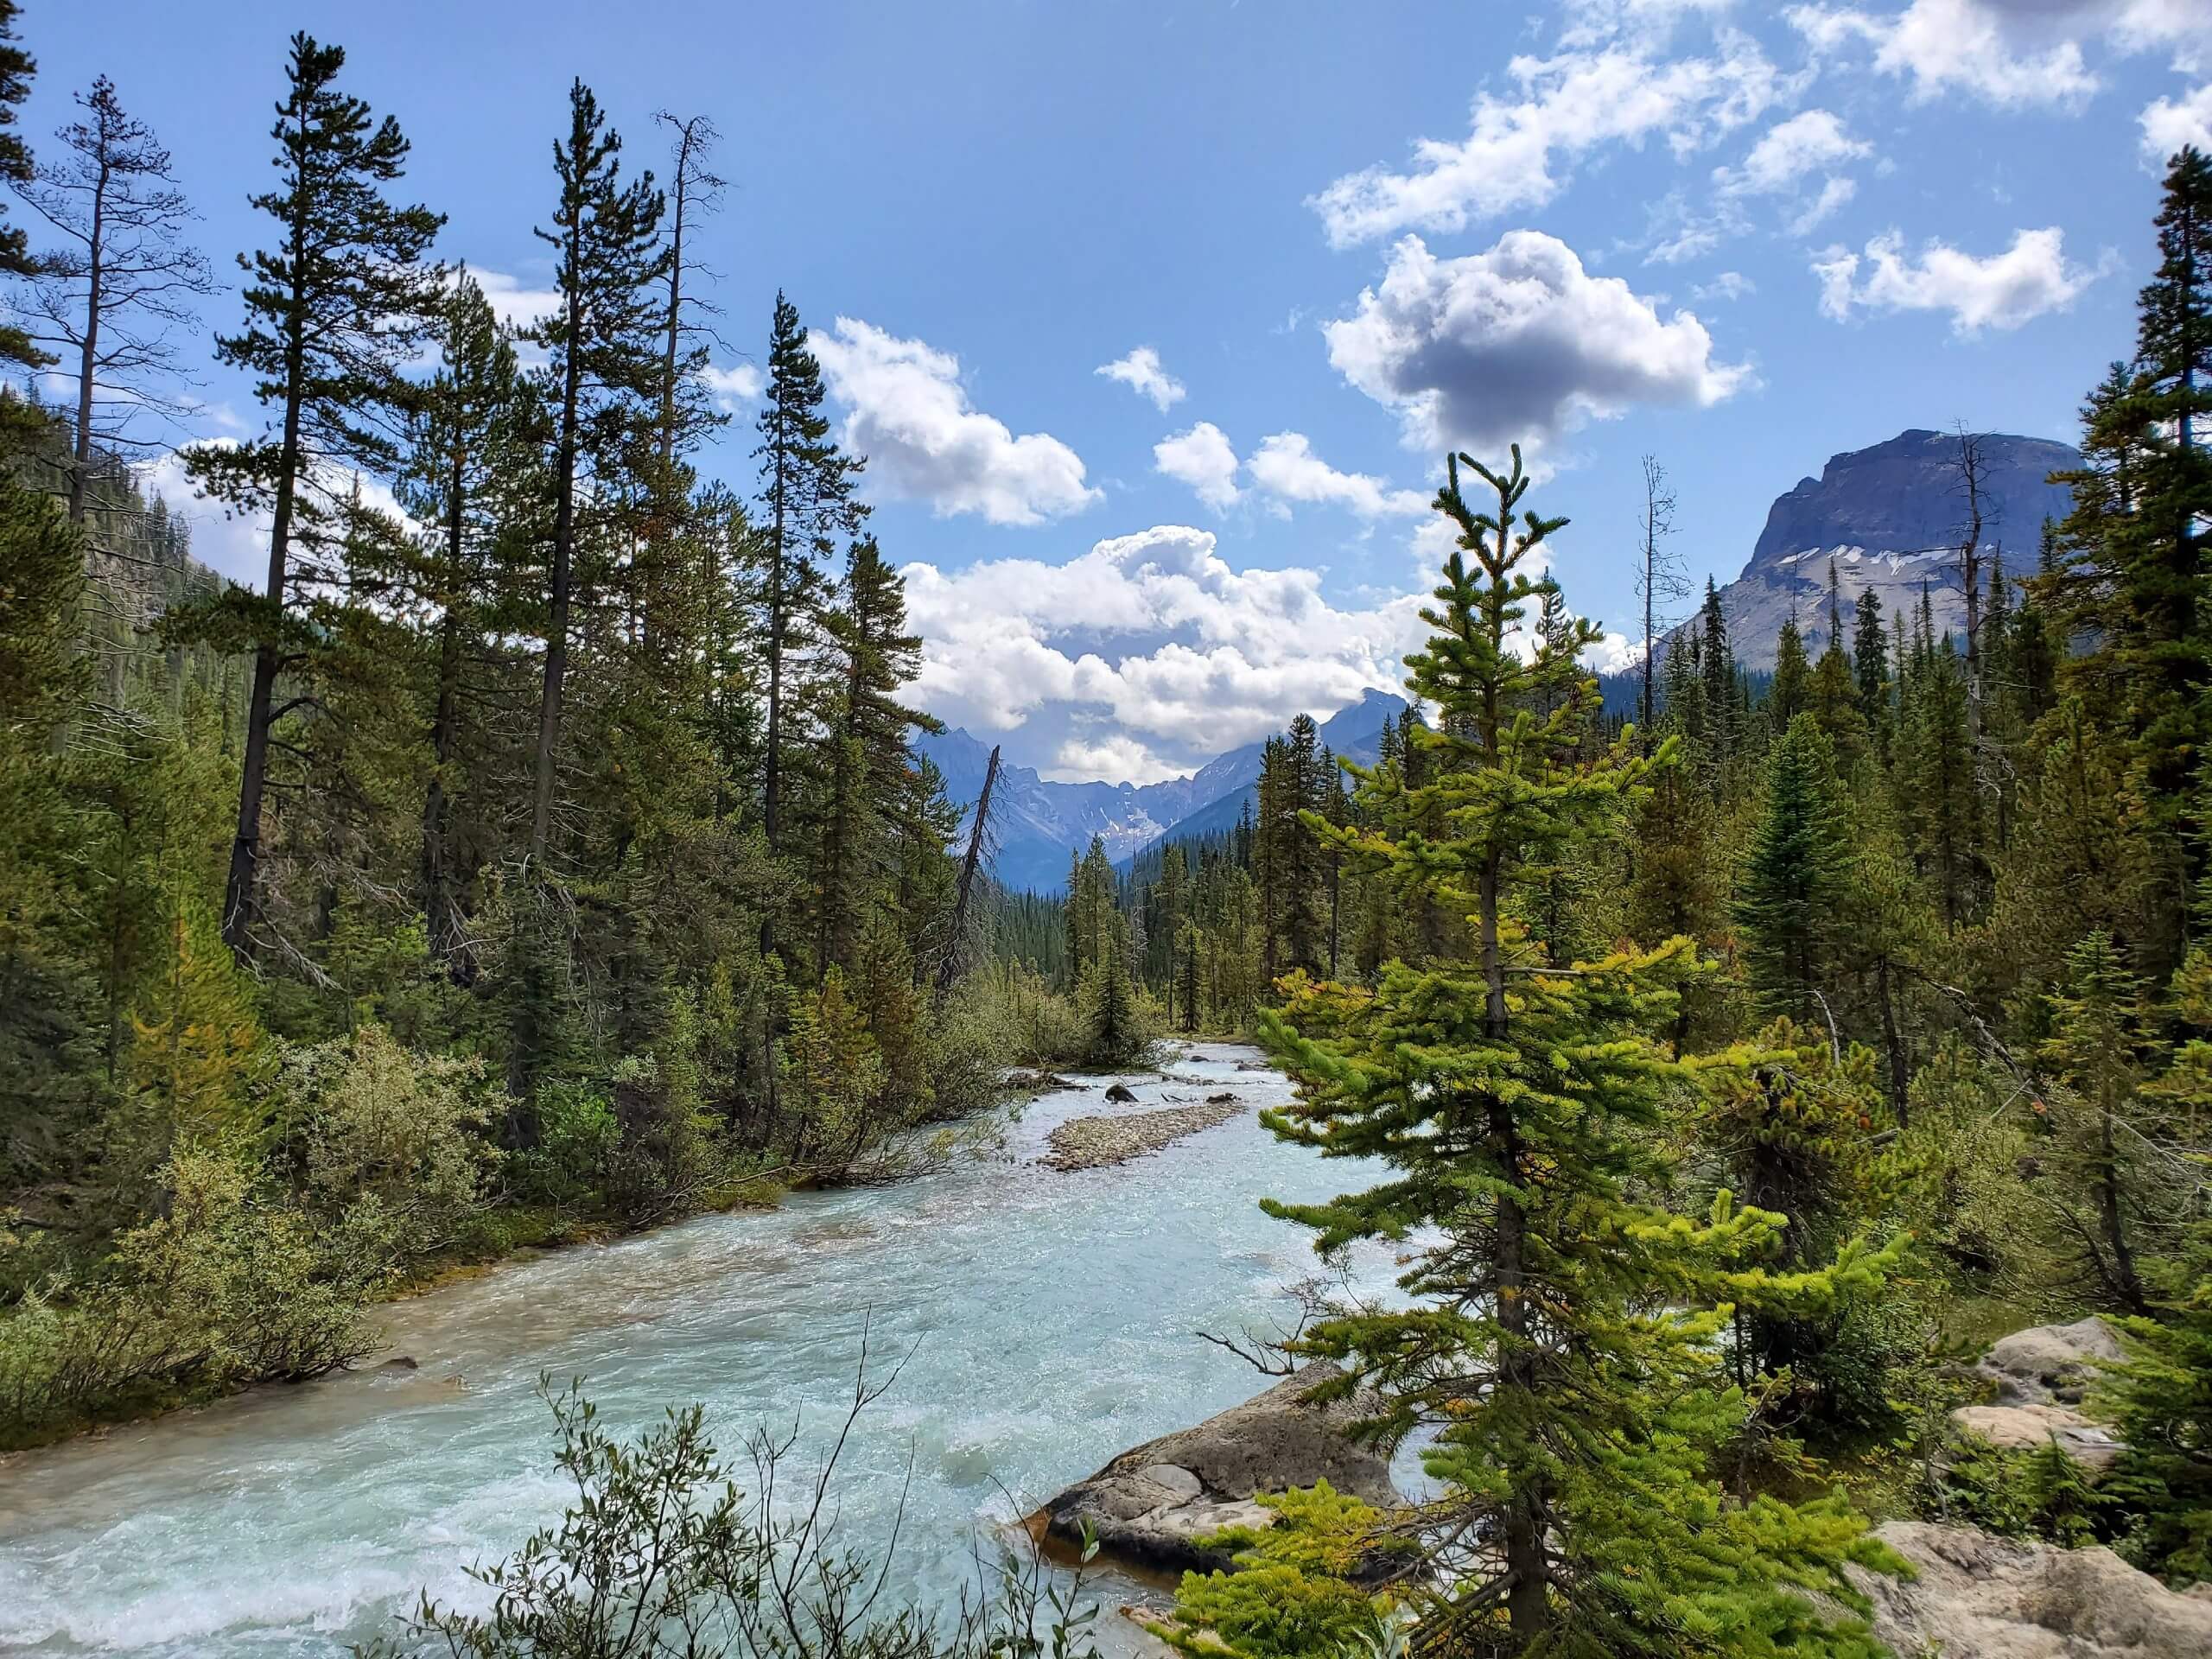
Starting from the parking lot, head north and pass through the Takakkaw Falls campground. Follow the wide path through both open areas and forests. At times the trail brings you down toward the Yoho River, where you’ll find exceptional views.
After walking 2.7mi, you’ll come to the Laughing Falls backcountry campground. The path splits here, and you should choose the trail that goes to the right, following the Twin Falls Creek. After another 1.4mi of walking brings you to the Twin Falls backcountry campground, where you will spend your first night.
Day 2: Twin Falls Campground to Little Yoho Campground via the Whaleback Trail (5.8mi)
Begin the day with a 1.0mi uphill climb to the Twin Falls Chalet. If you have time, this is a great place to take a short break and visit with the owner, Fran Drummond, who tells wonderful stories about this area’s history. Continue climbing from here, taking the Whaleback trail. Enjoy the beautiful views of Twin Falls, but be very careful and don’t get too close to the edge. Fatal accidents are known to happen here. Take time to explore the area, viewing the falls from different angles. Enjoy an extended break here and soak in the surroundings.
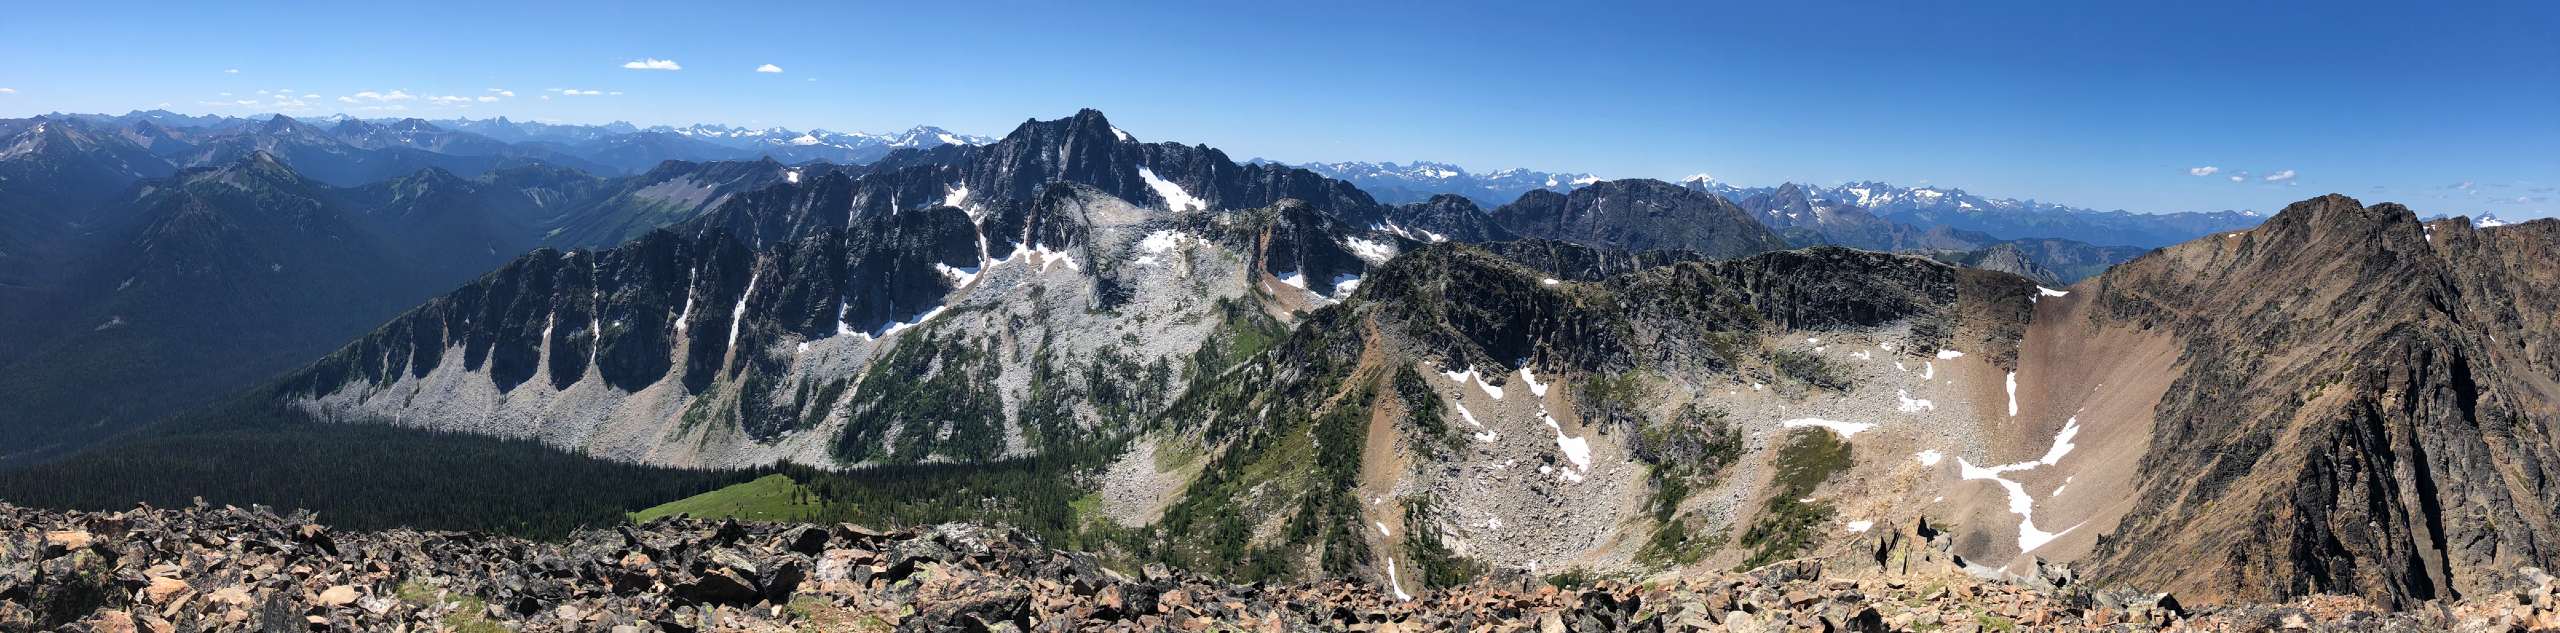
Continue to follow the Whaleback trail above the falls and cross the Twin Falls Creek. You’ll come to the edge of the forest, and the trail crosses into alpine terrain from time to time. Don’t miss the incredible colourful views along this stretch of the trail. Continue your hike on our favourite part of the whole route, over the Whaleback to an overlook. After this, the trail descends steadily. Be careful as you descend as the trail is steep in places, and the switchback can be especially slippery in the rain.
Connect with the Little Yoho Valley trail and continue to descend until you reach the intersection with the Iceline trail. At this junction, head right (west) for the Stanley Mitchell Hut, run by the Alpine Club of Canada, and the Little Yoho backcountry campground. Spend the night here.
Day 3: Little Yoho Campground to the Trailhead via the Iceline Trail (6.5mi)
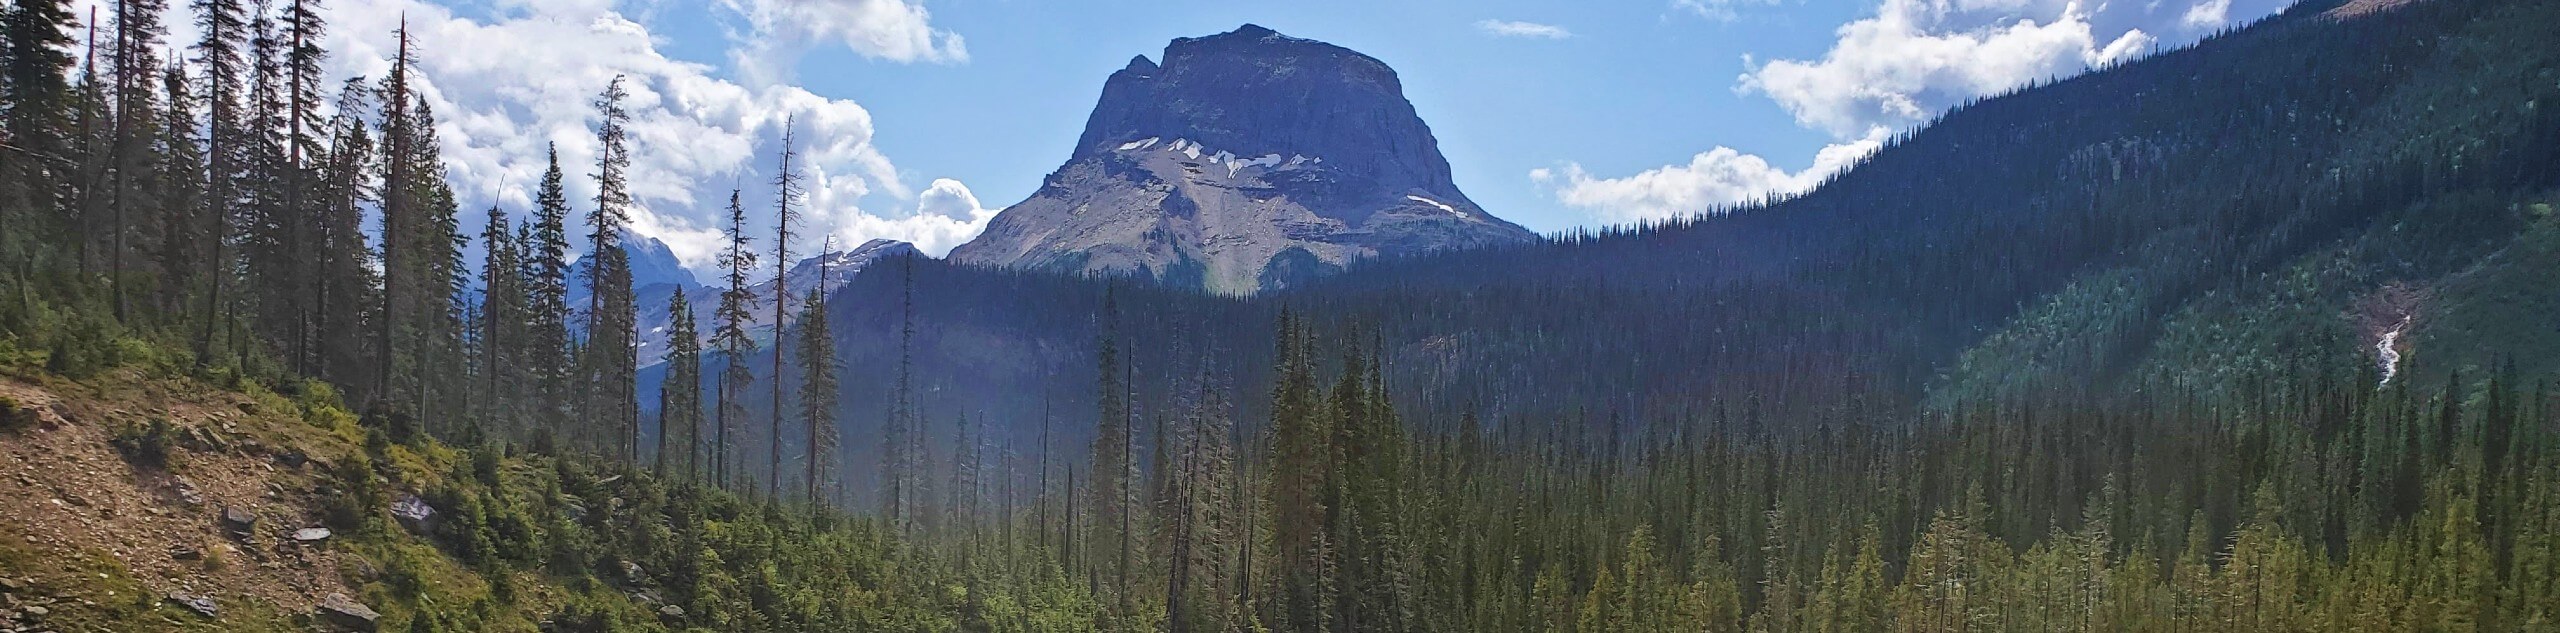
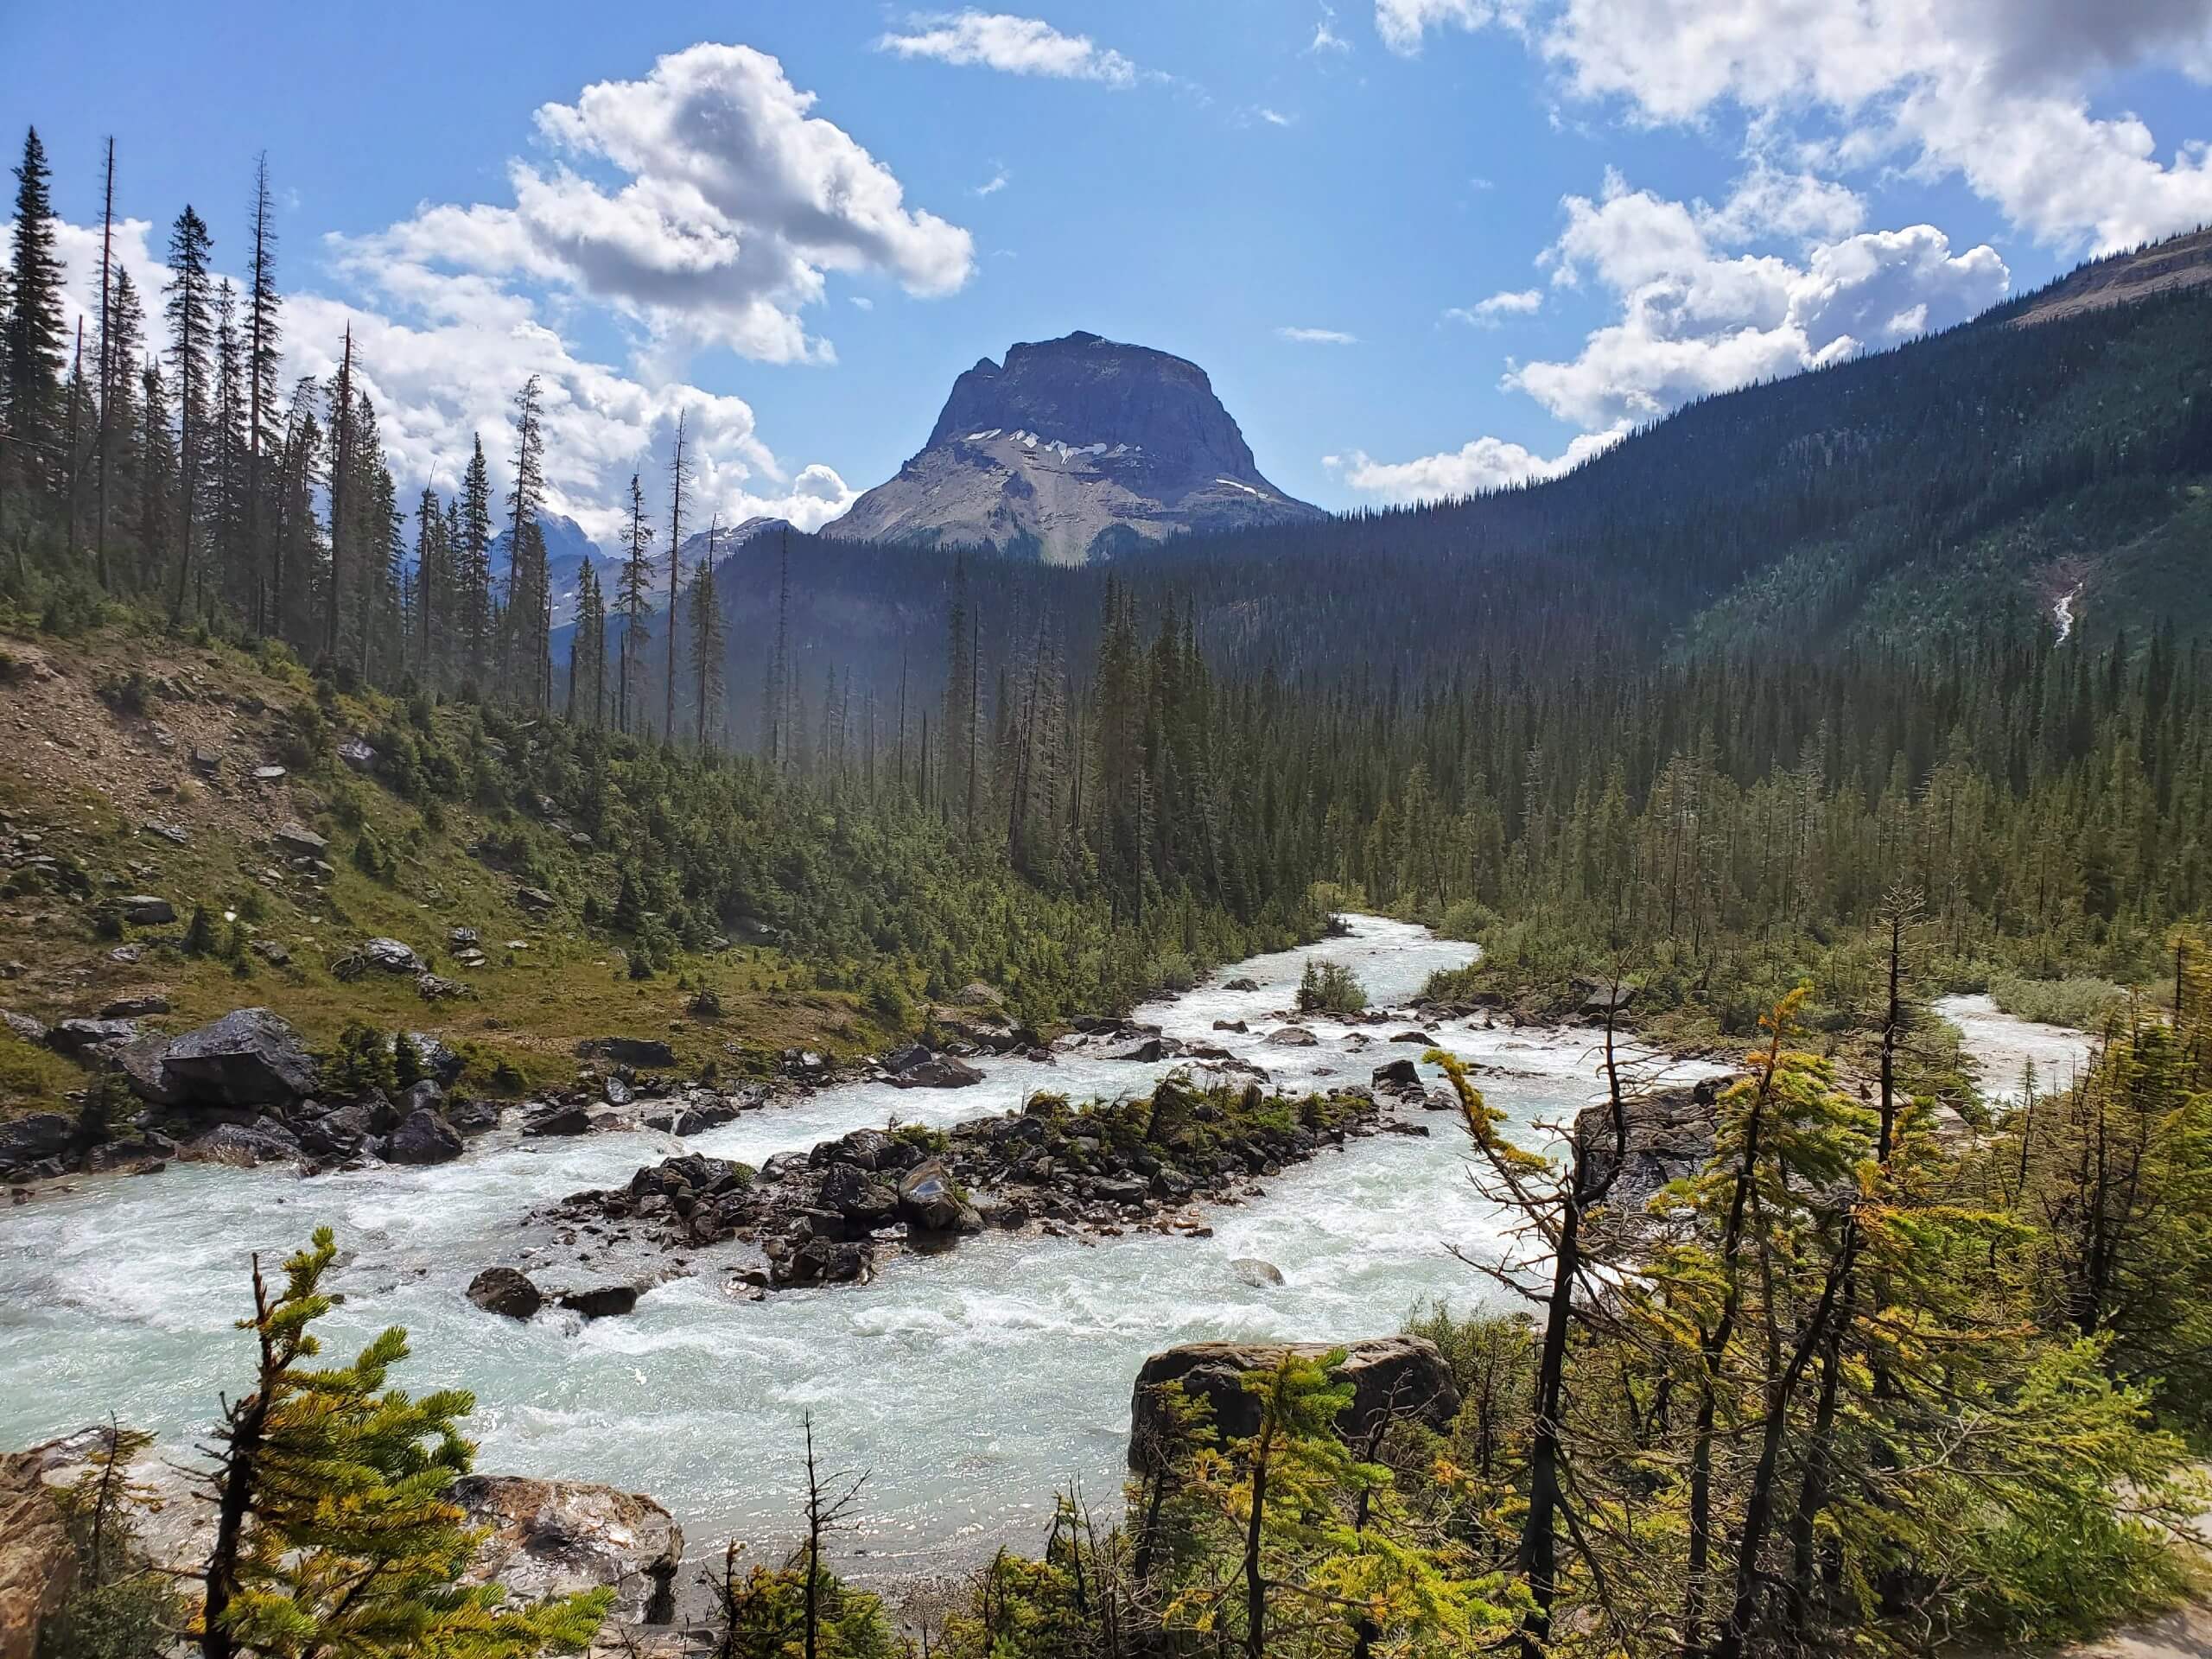
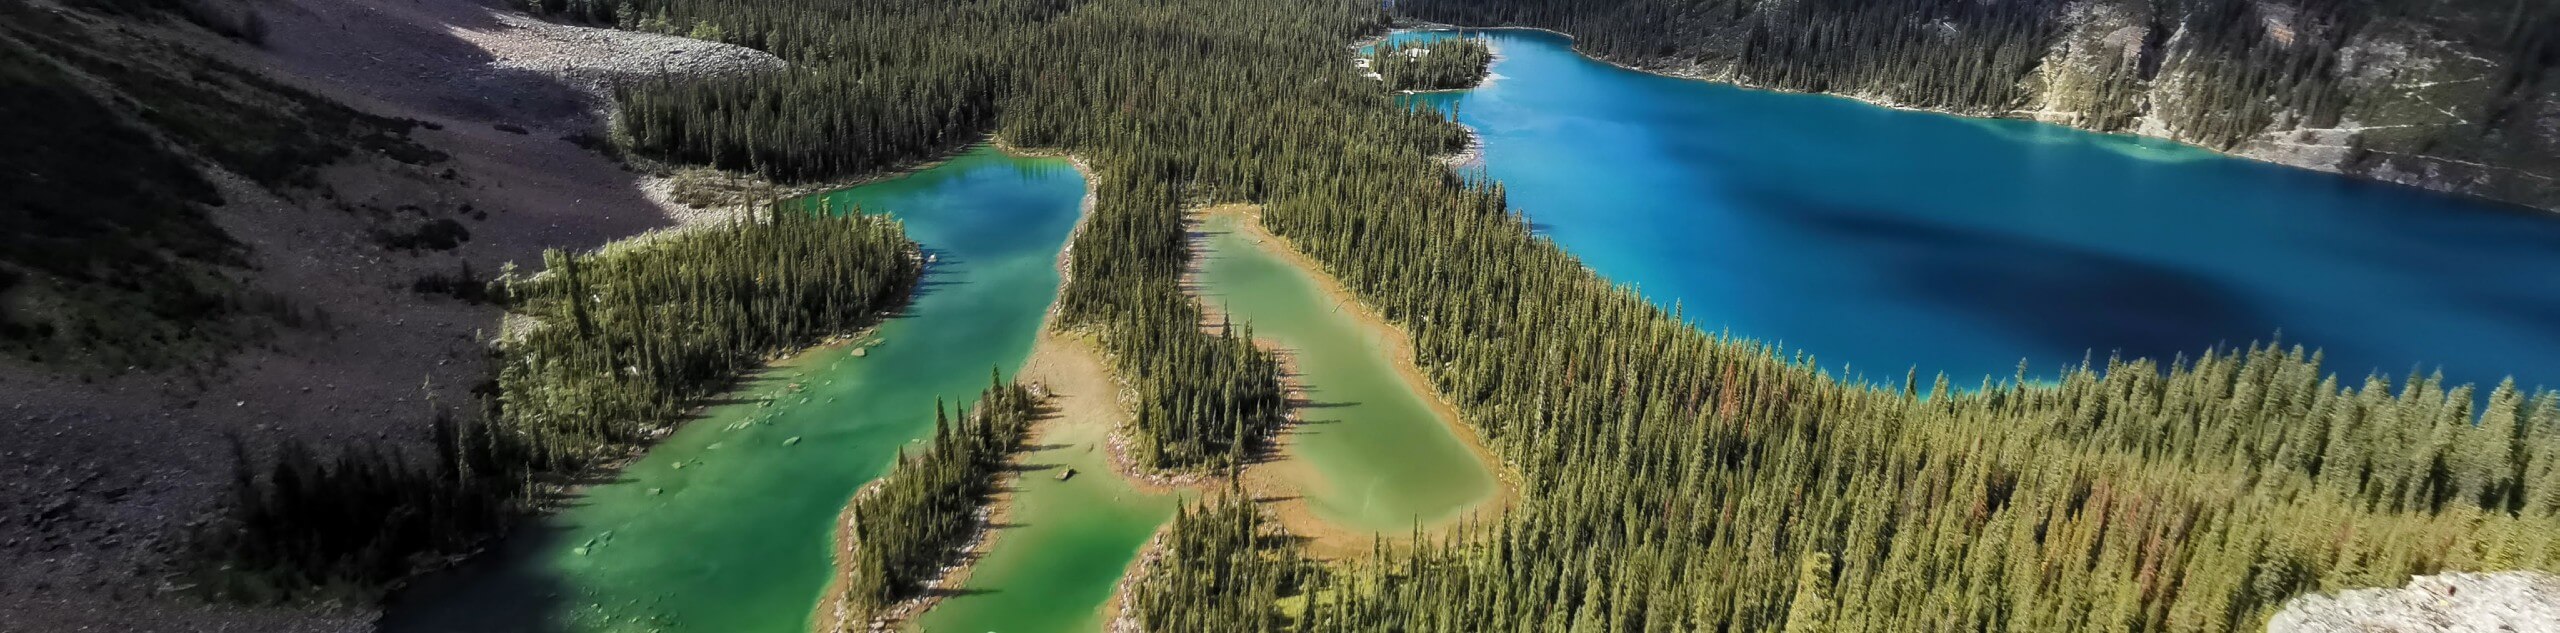
Return to the junction with the Iceline trail, and take this trail south. As Secretary-Treasurer Mountain looms overhead, follow this well-maintained trail as you climb above the treeline. You’ll gain about 656ft of elevation. Before long, you’ll come to some stunning mountain lakes. Have your camera ready to take some fantastic photos in this area!
Continue along the Iceline trail, where spectacular views will surround you in all directions as you cross glacial rock. Pause occasionally to look behind you so you won’t miss the remarkable vistas to the north. Eventually, you will reach a fork in the trail where an optional spur trail leads to the trail’s highest point, which lies between the first and second lakes.
The next trail junction comes as you reach the third lake. The trail leading down and to the left is the Celeste Lake Connector. This trail is a great option to get lower quickly if you find yourself caught in bad weather, particularly lightning. If the weather is clear, you’ll enjoy much better panoramic views by remaining on the Iceline trail.
After walking for about 4.3mi above the treeline, begin your descent. The trail will soon split again. Choose the path to the left to continue down into the forest. Do not take the higher trail on the right, which leads up to Yoho Lake. Descend carefully over a series of switchbacks, as this section of trail is very steep.
Soon the trees will clear, and you’ll reach a road. To the right along this road is the HI Yoho Whiskey Jack Wilderness Hotel. You are almost back to the car now. You can choose to turn left and follow the road back to the parking lot or take the scenic route by crossing the road and heading back into the forest. This trail brings you out to the Yoho River before leading you back to the parking lot. There are some breathtaking views along this route.
Optional: Add an Extra Day (5.3mi, 2051ft elevation gain)
To extend this route, you can easily add a third night at the Yoho Lake campground at the end of the Iceline trail. You’ll definitely enjoy staying out a little longer at this beautiful campground on Yoho Lake.
In the morning, walk about 2.5mi to reach Yoho Pass. For stunning views of the Emerald Lake Valley, continue down the other side of the path a short way. The total elevation gain is about 902ft. Since this is not a circuit route and you’ll return the same way you came, just take a day pack with you then break camp when you return to Yoho Lake campground.
To return to your car, follow the path above Hidden Lakes then rejoin the Iceline trail. You’ll pass the lovely Takakkaw Falls campground on the way to the parking lot. This part of the trail loses about 1148ft of elevation and climbs about 164ft.
About the Stanley Mitchell Hut
The Stanley Mitchell Hut is a beautiful log cabin nestled by the forest at the edge of a lovely meadow. It is owned and maintained by the Alpine Club of Canada (ACC). The hut sleeps 22 people and provides foam mattress pads, a propane stove, an outhouse, and firewood for heating with a wood stove. There is no running water, but there is a creek nearby. Cooking and eating utensils are also provided. Guests at this rustic backcountry hut are expected to share the living areas communally with other guests, contribute to general upkeep through cleaning, and chop firewood as needed, etc.
It is not necessary to be a member of the ACC to reserve a place in this hut, but members can reserve 12 months in advance and get a reduced rate. Non-members pay a little more and can only book 30 days in advance. Prices are also higher during peak season, from June 18 – October 8. Children are welcome and pay 50% of the adult rate. Advanced reservations are required and can be made online or by calling 403-678-3200 ext 0 between 8:30 AM and 8:30 PM daily.
Insider Hints
If you'd like to stay longer in the area and continue exploring, the HI Yoho Whiskey Jack Wilderness Hostel is a great budget option.
To get an early start on the first day, consider staying the night before at the Cathedral Mountain Lodge at the base of Yoho Valley Road.
These are challenging trails, so be sure you are in good shape and well-equipped for the trip.
This route can be done as a long single day hike. Backpackers in good physical condition can also choose to do this two-night route with just one night. If you choose to do so, stay at the Little Yoho campground or the Stanley Mitchell Hut.
To avoid carrying a tent, you can choose to do this route in two days and spend the night at the historic Stanley Mitchell Hut. This location is simply amazing. Note: If you're staying at the Stanley Mitchell Hut, you can leave your tent at home, but you'll still need your own sleeping bag and food.
Similar backpacking trails to the Yoho Valley Backpacking Route backpacking trail
Lake O’Hara Backcountry
Explore the incomparable Lake O'Hara area of Yoho National Park on this backcountry trek that totally immerses you in western…
Frosty Mountain Loop Backpacking Trail
The Frosty Mountain Loop Backpacking Trail is a 16.8mi loop through E.C. Manning Provincial Park that takes hikers…

PCT Northern Terminus Backpacking Trail
The PCT Northern Terminus Trail is an amazing hike within E.C. Manning Provincial Park that takes hikers to the northern…
Comments